How to Build a Raised Garden Bed: The Complete Guide to Home Gardening 2026
“How to Build a Raised Garden Bed” — in the U.S., raised garden beds are practically a “standard feature” of backyard gardening. Whether you live in California, Texas, New York, or Florida, as long as you have a small yard and a desire to grow something, a raised garden bed is one of the easiest and most rewarding gardening projects you can undertake. In today’s article, I’ll walk you through the entire process—from planning to harvest—step by step.
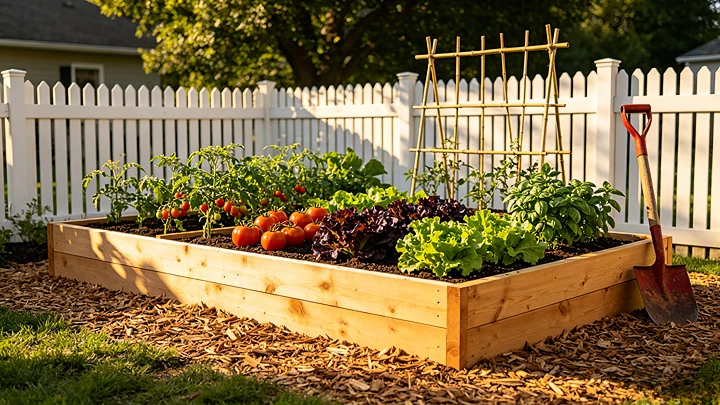
First, let’s talk about why raised garden beds are so popular in the U.S.
- For one thing, they solve soil problems. The soil in many American backyards is either heavy, clay-like red soil (as in the southeastern states) or hard, rock-strewn soil (as in New England). Planting vegetables directly in the native soil prevents the roots from spreading properly. Raised garden beds let you use your own custom-mixed soil, completely bypassing this problem.
- Second, they are easier on your back. In traditional vegetable gardens, you have to bend over and squat while working, and after a single planting session, your back aches for days. Raised garden beds elevate the planting surface to knee or even waist height, which is a godsend for seniors, people with back problems, or anyone who doesn’t want to bend over.
- Third, they get you started sooner. The soil in raised garden beds warms up much faster than ground-level soil in the spring, allowing you to start planting one to two weeks earlier than in traditional garden beds. For northern states with short growing seasons, this time difference means you can harvest an extra crop.
- Finally, they’re clean and tidy. The raised beds neatly enclose the planting area, making it harder for weeds to invade, and keeping fallen leaves and mulch from scattering everywhere. This “orderly aesthetic” is exactly what American backyards are all about.
Step 1: Choosing a Location—Half the Battle of Growing Vegetables (or Failing) Depends on This
Sunlight is the top priority. The vast majority of vegetables (tomatoes, peppers, cucumbers, green beans, etc.) need at least 6 to 8 hours of full sun each day. Keep this golden rule in mind when selecting a location: place the raised bed on the south side of your house, with its long side running east to west. This ensures the plants receive the most even sunlight throughout the day.
Never place your garden bed directly under a large tree — the shade will block sunlight, and the tree’s roots will compete fiercely for water and nutrients, which is practically a recipe for failure. Also, avoid the north side of your house, as it simply doesn’t get enough direct sunlight year-round.
Water access is the second key factor. Raised garden beds dry out faster than ground-level beds and require almost daily watering during the hot summer months. If your raised bed is too far from a water spigot, you’ll quickly lose your enthusiasm for gardening after dragging a hose back and forth every day. So, when choosing a location, try to stay as close as possible to an outdoor water spigot.
The ground must be level. Once you’ve chosen a spot, clear away all plants, rocks, and debris, and use a shovel to level the ground. You don’t need to lay concrete or stone slabs, but at the very least, make sure the raised bed won’t wobble once it’s in place.
Step 2: Choose Materials—Wood, Brick, or Metal?
There are many options for raised garden bed edging materials, each with its own pros and cons.
Cedar is considered the “gold standard” for American gardeners. Its naturally occurring oils and compounds help protect against decay and insect damage, reducing the need for chemical treatments. With proper care, cedar raised beds can last 20 to 25 years. The trade-off is the higher cost — a standard 4-by-8-foot cedar raised garden bed typically costs around $150.
-1.png "How to Build a Raised Garden Bed")
Redwood, like cedar, is a high-quality, naturally preservative-resistant wood—and it’s similarly pricey.
Pressure-treated lumber is an affordable option, typically costing around $75 to $100 per raised garden bed. Older lumber treated with CCA (chromated copper arsenate) raised concerns about arsenic leaching; however, CCA has since been phased out of modern residential treatments, making today’s pressure-treated lumber much safer. If you prefer an extra layer of protection, you can line the inside of the bed with landscape fabric to create a barrier between the soil and the wood.
Cinder blocks are another popular choice—they’re durable, inexpensive, and require no nails. When building a garden bed with cinder blocks, remember to stack them in a staggered pattern to offset the joints and increase stability.
Galvanized metal has become increasingly popular in recent years—it doesn’t rust, requires no maintenance, and has a modern aesthetic.
If you’re just looking for a low-commitment option, you can easily mound up soil for a bed or outline it with stones for a casual border.
Regarding dimensions: The most common standard size is 4 feet wide by 8 feet long, with a depth of at least 10 to 12 inches. Keep the width under 4 feet so you can easily access the center of the bed from both sides, eliminating the need to step into the bed and thus avoiding soil compaction. The length can be adjusted flexibly based on the space available in your yard.
Step 3: Get Building—You Can Finish It in a Single Weekend
Using the most common 4×8-foot wooden garden bed as an example, here’s a step-by-step guide to building one.
Materials you’ll need:
- Two 8-foot-long boards (for the long sides)
- Two 4-foot-long boards (for the short ends)
- Pressure-treated wood screws or galvanized nails
- An electric drill or hammer
- A level
-2-1.png "How to Build a Raised Garden Bed")
Assembly steps:
- Step 1: Cut the lumber. Cut the boards to the dimensions listed above. If you use 2×12-inch boards, the depth will be 12 inches, which is plenty of space for most vegetables to grow well.
- Step 2: Assemble the frame. Arrange the four boards in a rectangle, with the short sides tucked inside the long sides. Secure them at the four corners with screws or nails. For added stability, you can add a small wooden slat inside each corner to brace the frame.
- Step 3: Level the frame. Place the assembled frame on the ground you’ve previously leveled, and check it with a level. If the ground is slightly sloped, you can add some gravel or sand under the lower side to level it out.
- Step 4 (Optional): Lay down weed barrier fabric or wire mesh. If gophers or rabbits are common in your area, you can lay a layer of ¼-inch wire mesh at the bottom of the garden bed. If your only goal is weed prevention, a layer of landscape fabric will do the job.
- Step 5: Leave a “back door.” If you’re bringing in soil with a wheelbarrow, leave one side open while assembling, and then close it after filling.
Step 4: Filling with Soil—The Heart of the Garden Bed
Now that the garden bed is set up, the type of soil you use will determine your harvest for the season.
The most classic formula in American gardening is “Mel’s Mix,” from Mel Bartholomew’s Square Foot Gardening. The recipe is simple:
- 1/3 compost
- 1/3 peat moss or coconut coir
- 1/3 vermiculite
-3-1.png "How to Build a Raised Garden Bed")
Compost provides nutrients, peat moss or coconut coir helps retain moisture, and vermiculite ensures good drainage and aeration. The beauty of this mix is that it provides excellent drainage, aeration, and moisture retention—addressing three seemingly conflicting needs.
If you want a simpler, lower-cost option, you can use 50% to 60% high-quality topsoil mixed with 30% to 40% compost, plus about 10% of a coarse-grained amendment (such as perlite, sand, or well-rotted bark). Many gardeners also add a portion of native topsoil to Mel’s Mix.
Never use “fill dirt”—it’s meant for filling pits and is full of rocks, clay, and weed seeds.
How much soil do you need? A 4-by-8-foot, 12-inch-deep garden bed requires about 32 cubic feet (approximately 1.2 cubic yards) of soil. For two such beds, you’ll need 2.4 cubic yards. For large quantities, we recommend arranging a bulk delivery directly with a local landscaping company—it’s much cheaper than buying bags one by one at Home Depot.
Money-saving tip: If your garden bed is deeper than 12 inches, lay a layer of wood chips or branches at the bottom (this is called the Hugelkultur method), then add 12 inches of good soil on top. This can save you a lot of money on soil.
Step 5: What to Plant? — Classic Combinations for American Home Vegetable Beds
Once your vegetable bed is filled with soil, what you plant depends on your USDA Hardiness Zone and personal preferences.
For shallow vegetable beds (6 inches deep), plants with shallow root systems are ideal: lettuce, spinach, arugula, radishes, strawberries, and herbs such as basil, cilantro, and mint.
For medium-depth garden beds (12 inches), you can plant green beans, broccoli, cabbage, carrots, cucumbers, kale, zucchini, and beets.
In deep garden beds (18 inches or more), tomatoes, peppers, eggplants, okra, sweet potatoes, and watermelons all grow very well.
Classic combinations across the United States:
Northeast and New England (Zones 5–6): Plant tomatoes, peppers, and green beans in late spring; you can plant another crop of lettuce and spinach in late summer.
Southeast (Zones 7–8): Plant cool-weather vegetables such as beets, carrots, and kale in early spring; plant cucumbers, eggplants, peppers, tomatoes, and zucchini in late spring and summer.
Midwest and Southwest (Zones 6–9): Raised beds provide excellent drainage and are particularly well-suited for these regions.
West Coast (Zones 8–10): You can grow crops almost year-round, including various leafy greens even in winter.
Planting Tips:
- Plant crops with similar water requirements in the same raised bed. Tomatoes and basil are a great pairing, but avoid planting tomatoes alongside succulents.
- Consider the mature size of plants and avoid planting seedlings too densely.
- Take advantage of the raised garden bed’s ability to warm up quickly to start seeds early in the spring.
- In the fall, plant cool-weather crops like kale, spinach, and garlic to extend the harvest season.
Step 6: Watering and Care—Don’t Let Your Hard Work Go to Waste
-4-1.png "How to Build a Raised Garden Bed")
The biggest “drawback” of raised garden beds is that they dry out quickly. During hot summer days, the soil can dry out completely in just one day.
Recommended Watering Methods:
The most hassle-free option is a soaker hose paired with a timer. Coil the hose inside the raised bed, connect it to a faucet and timer, and it will water automatically every day. The soaker hose delivers water directly to the roots, saving up to 80% more water than sprinkler systems. Many American gardeners lay permanent tubing between raised beds, using a single timer to water four or five beds—a one-time setup that lasts.
Mulching is also essential. After planting, spread a layer of mulch (such as pine needles or shredded bark) about 3 inches thick over the soil surface to retain moisture and suppress weeds. Be sure not to use fresh wood chips—only use well-decomposed mulch.
Crop rotation is also important. If you grow the same crop in the same spot year after year, pathogens will accumulate in the soil. Rotating your planting locations each year helps keep the soil healthy.
Final Reminders
Raised garden beds are not a one-time project. Each spring, add one or two inches of fresh compost to replenish the nutrients used up during the previous growing season. The soil will settle over time, so you’ll need to top it off a little each year.
If this is your first time, don’t bite off more than you can chew. Start with a small 4-by-4-foot raised bed, and expand gradually as you gain experience. The joy of gardening lies in the process, not the scale.
From choosing a sunny spot to assembling the frame, filling it with good soil, and sowing the seeds—the whole process takes just a weekend. But over the next few months, watching your tomatoes turn red, your cucumbers climb their vines, and your herbs release their fragrance every day brings a sense of satisfaction you can never buy at the supermarket.
Get your lumber today—you can start building your raised garden bed this weekend!